Download Tutorial Lengkap (PDF 963 KB)
TAKING OBLIQUE AERIAL PHOTOGRAPH
3.1 Oblique Aerial Photograph

Oblique Aerial Photograph usually is taken to a property object on land and used for evaluation purposes, promotion, Ads, Company Profile, asset inventarization, etc. Providing aerial photograph may add portofolio, make a different view and thought and in many case creating new idea and perspectives.
Oblique Aerial Photograph is taken with specified angle of view from a specified direction which it’s creating the best result according to the requirements.
Oblique Aerial Photograph is usually requested to industrial estate, tourism object, residential complex, office complex, high rise building, real estate etc.
3.2 How To Take Oblique Aerial Photograph
As previously mentioned, Oblique Aerial Photograph is taken with specified angle of view from a specified direction. It means the photograph should be taken from specified coordinates and altitude, Hence the Pilot should plan The FY31-AP Auto Pilot to allow the UAV fly and go through this coordinate and take the photographs.
The coordinates should be able to be planned into the route by having this coordinate as one of the way point. But since the photograph should be taken from a specified angle of view, the route should be very carefully calculated according to the position of camera lens to create a specified fly path with a precise camera angle of view to the object.
Usually the UAV fly over the coordinates several time and take many pictures before and after way point to allow best picture taken during the flight.

3.3 Instruments Required to Take Oblique Aerial Photograph
The following are instruments required for taking Oblique Aerial Photograph:
a. GPS for distance horizontal position Posisi from object (m)
b. Barometric Altimeter (m)
c. Airspeed with Pitot Tube (km/h) to control speed of UAV and avoid stall
d. Inclinometer for data logging pitch and roll angle of UAV and camera
e. Tachometer, Engine Temp for flight monitoring
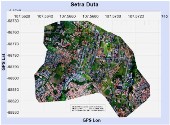
3.4 Oblique Aerial Photograph Result


4. TAKING VERTICAL AERIAL PHOTOGRAPH
4.1 Vertical Aerial Photograph
Vertical Aerial Photograph is required to generate a scaled map for many purposes such as Area Mapping, Area or District Planning, Industrial Estate, River Area, Residential Area etc. Scaled Map actually is a mozaic result of a many vertical photographs. Some Map generated from hundreds or thousands of photographs. More photographs will created more interested scaled map, but requires more powerfull computer image processing.
With the correct camera with lenses fly around 500m AGL, UAV Dart Pro3 allow owner to take advantage of the UAV to have vertical photographs and mosaic them into Map scaled 1:1000, 1:1500, 1:2000 or 1:2500.

The difficulties began since the photograph result should be checked, some of them need to be corrected before it can be mosaic. The photograph need to be corrected due to during the flight (and photoshoot), UAV may have incorrect pitch and roll angle, i.e. not 0 degree, hence the photograph taken will be an oblique photograph.
The photograph may be corrected if the pilot know UAV angle of pitch and roll whenever take a photograph. Photograph then should be corrected by calculating relative angle of the UAV from the earth or object taken.
4.2 How To Take Vertical Aerial Photograph
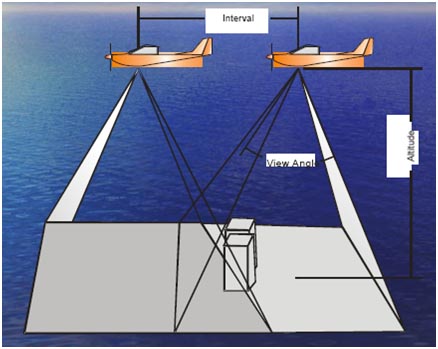
To allow the Vertical Aerial Photograph to be mosaic, each photograph should be taken overlapped with others. It means some objects should shoot in more than one photograph. Some mosaic software requires specific overlapped i.e. at least 10% of the photograph width or length.
To realize this, Pilot should plan the flight route very carefully by entering several coordinates as the way point, fly the UAV on the specified altitude , make it fly very stable and then the photographer should take many photograph start from a start point and take many others with a specified time intervals.
4.3 Instruments Required to Take Vertical Aerial Photograph
The following are instruments required for taking Vertical Aerial Photograph:
a. GPS for Coordinate Data Logging (DMS), GPS Altitude , GPS Course
b. Inclinometer 2 axes for longitudinal (pitching) dan lateral (rolling).
c. Airspeed with pitot tube ( km/h) for time interval control
d. Barometric Altimeter (m)
e. Tachometer dan Engine Temp
4.4 Vertical Aerial Photograph Result

5. AERIAL PHOTOGRAPH DATA RESULT & DOWNLOAD
After an aerial photograph mission, the following result can be obtained by download them from their equipment or saving media (such as card).
Flight Data Recorder
• GPS Coordinate dan GPS Altitude, GPS Course
• Barometric Altimeter (m)
Photo Camera
• Data Photo digital
• Time History
GPS Photo Tagger
• GPS Coordinate dan GPS Altitude, GPS Course
• Time History (hh-mm-ss)
Video System with OSD
• Data Photo digital with GPS Coordinate, Time history.
Selamat Terbang...